Hey guys, welcome back! Today I want to show you my daily hair routine, let’s go!
Many people ask me these three questions: – Which product do I use? – How often per week do a shower? – What are the steps of my daily hair routine?
Which Products do I use?
Right now I’m using the products of Fable and Mane. I use the shampoo, conditioner, the mask and the hair oil. They keep my hair strong and hydrated. The link to the products are of course in the description of my YouTube video.
How often per week do I shower?
I shower almost everyday. I’m going to the gym and sweating, so it is really necessary. I wash my hair everyday, but I don’t use shampoo everyday. That way my hair doesn’t dry out. When I don’t use shampoo I only use water and conditioner.
My hair routine
Before the shower
Once a week I use hair oil by Fable and Mane. This product strengthens the roots. Fort hat you need partly wet hair. You can either do it right before showering, because you have to rinse it out later, or you can do it right before going to bed, if you shower in the morning. With the oil comes a pipette. You drop a few drops of oil onto your roots and then gently massage them in with a comb. Then you let the oil soak in for at least 5 minutes, I do it overnight. Then you wash it out with shampoo.
Shower
As I said before I use shampoo every second day. Besides other ingredients there is coconut herb in the shampoo of Fable and Mane. It is important that your shampoo doesn’t dry out your hair too much. That’s why you shouldn’t use too much of it as well. Massage it in from front to back and let it soak for not more than 60 seconds. After that, wash it out.
Then I use the conditioner. It softens the hair and strengthens the ends. Again: don’t use too much. Rub it in your hair, not in your skin. It’s a product for the hair, not the skin. Wait for at least 1 minute and then wash it out. It’s important to wash everything out, because if you want to style your hair later and there is still some conditioner in it, it might feel heavy and it’s harder to style that way.
Once a week I also use the hair mask. It helps to hydrate and repair the hair. When you wash it too often and don’t use additional care, it is possible that your hair might get damaged. Let it soak in for at least 5 minutes up to 2 or 3 hours. After that wash it off.
Also remember, if you dry your hair with a towel, don’t rub heavily, but rather try to be gentle. This is much less damaging.
So, this is my hair routine. I hope you liked it and and are able to implement some of those things into your own routine. Definitely check out my YouTube channel and my other blog posts and videos on fitness, styling and modeling.
Hey guys, I hope you are all doing well! Today I want to show you my stretch routine. It helps to loosen up in the morning and before exercise. With just ten minutes it is easy to implement into your day, let’s go!
Hands to the floor:We start by standing up, keeping our legs straight, bend over the upper body and touching our toes. If you can’t reach your toes yet, it is not a big deal, you will get to it. The important thing is to keep your legs straight. If you want, you can stretch out your body a few times in between.
Walking Sun Salutation: Now we put our hands to the floor, walking forward with them, the legs stay where they are. Again, try to keep them as straight as possible. When we arrived in the yoga „downdog“ position (some sort of push up position, but with straightened arms and back), we do the „updog“: Pushing through, straighten our arms and back again, opening our chest, greeting the sun. Then we go back do the updog and walk back.
Groin and butt strech: We start on our knees and do a big step forwards with our left leg. Then we sit deep into it. You should feel the stretch now in your right groin, it’s very liberating. Remember, while doing this, to activate your abs to protect your lower back. When we are finished with one leg, we do the other.
Side leg stretch: We stay with the legs. So we stand up again, bend one leg and lean to the side, keeping one leg straight. Try to keep your upper body straight and activate your middle, that’s very important. When we are done, we do the other one.
Frog position: It looks like the tailor seat, but it is not. Instead of crossing our legs, we put our soles together, creating a pressure and therefore a strech in the groin.
Leg extension stretch: We stay seated, stretch our legs to the front and bend over. It is quite similar to the very first exercise, just now we are seated.
Harmstrings stretch: To make it even more intense and specific we concentrate now on one leg at a time. For that we angle one leg tight to the body, while stretching the other one, leaning over it in the process.
Core rotation stretch: Now it is getting a bit more complicated. When we start with the right side, the left leg is stretched out, while we pull the right one close to our chest, crossing it over the left leg. Now we rotate our upper body to the right side creating a pressure in pushing our left arm against the outside of our right leg. See? It’s easy! 😀
Neck stretch: We stay seated, legs stretched out, upper body straight. Now we lay our hands at the back of your head, pulling it down gently.
Neck stretch sides: The same we do with each side, using only one hand in the process.
Leg extension stretch: Now we stand up again (feeling better already?). While keeping our body straight we angle one leg to the back, grabbing the ankle and pulling it gently. Try to stay straight, it should stretch your upper leg muscles.
Back stretch: Okay, this one may seem a little odd. We sit again and start the motion of a backwards roll. But we don’t actually roll through it. Rather we keep laying on our upper back, our toes touching the floor above our head.
Harmstring Stretch Left: Now an easier exercise again. One leg forward, the other one back, leaning over the stretched front leg.
Shoulder Rotation: This one is very good to loosen up the back. We rotate our shoulders forwards, then backwards, arms on the side.
Body rotation: To finish it up, we rotate our body to each side. Be careful here and only to what feels right to you. After that we are done!
That’s a great way to start the day! I hope you liked this little different approach to a routine and check out all my other workouts, tutorials and vlogs on my YouTube Channel @fabianxarnold.
Hey guys and welcome back to a new blogpost. This is something special for me I have never done before in my life so lets see how it goes. I am driving motorbike since im 16 years old and definitely love to be on the road with a bike. Special thanks to Triumph Germany for partnering up as an Ambassador for this special traditional company.
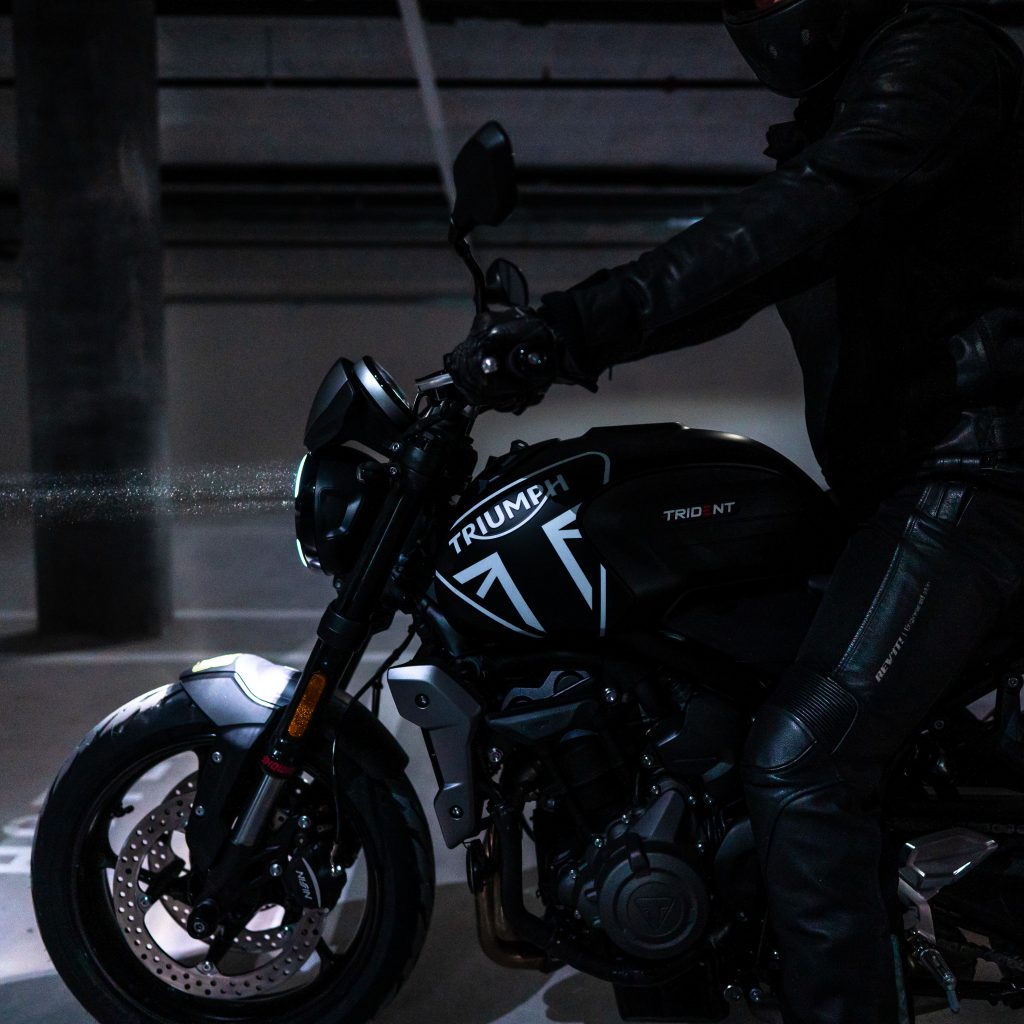
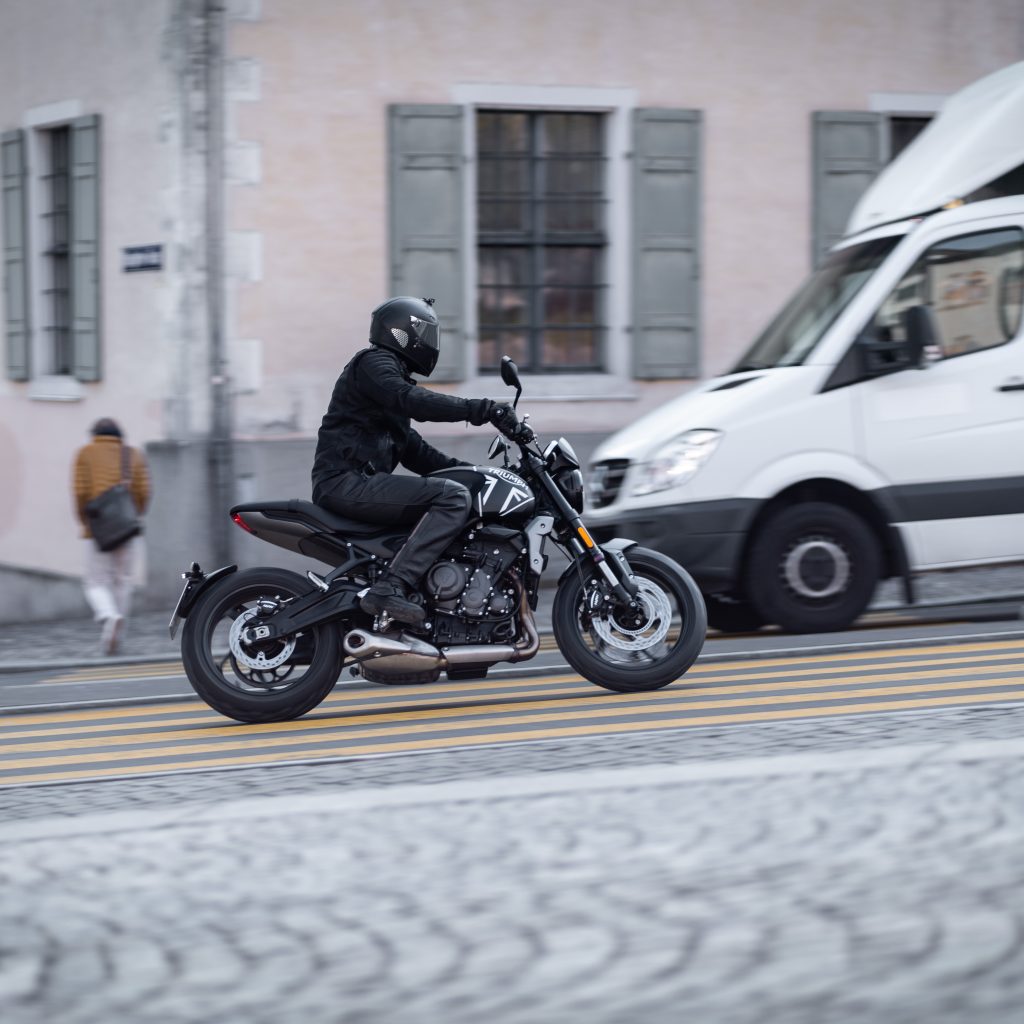
In this blogpost I am going to give you a review of the new Triumph Trident 660. It’s the new middle class bike for beginners and for every day use for advanced motorbike riders.
“Triple powered performance, class leading technology and specification, all at an incredibly competitive price.“
Appearance:
4 different Colours (Matt Jet Black Silver Ice / Silver Ice Diablo Red / Saphire Black / Crystal White)
Matt black with a few details red and silver
Cool number plate holder
Stubby short tail section
LED Lights
The 660 triple engine delivers the perfect balance of low down torque and exhilarating top end power for optimum thrilling and responsive performance.
Facts:
660ccm
64nm peak torque
81 PS Peak Power
16.000km service intervall
6 gears
Seat Hight 80.5 cm (tall or shorter riders? Yes its neither as low as a bobber and tall as a tiger) – but you cant lower it!
Tank Capicity 14L
189 kg
Is it a good everyday Bike? – Distance Bike?
It is not really good touring bike because it has no windscreen, bags etc., BUT definitely a every day bike for some tours and also for the city. It is very good to handle and that makes it the perfect bike for people and for young beginner driver. Also perfect as second bike for every day instead of using your expensive one. The third group the Trident is perfect for are older riders that want to downgrade.
You have a nice upright riding position, its very light and easy movable and has power as well. The throttle is very easy for beginners (not as aggressive). The bike comes with two modes: Street mode and Rain mode (Less aggressive throttle responds)
Display:
Shows everything you need
Speed
Time
Gear position
Rotation speed
Lights
ec.
Additional Navigation pairing with phone
Accessories:
Quick Shifter
Heated Grips
Bluetooth Modul – Navigation
USB Charger under Saddle
No exhaust accessory
Personal Final feedback
The Trident 660 by Triumph is the perfect mix between a beginner bike and also perfect handling for an every day bike. It combines traditional with modern style and you will be unique, instead of all the Yamaha MT 07, Honda CBR and Kawasaki out there.
Its the perfect allrounder and I can really recommend to go and check it out!
Thats about what I have to say about the motorbike. You will find the full review on my Youtube Channel so definitely go and check out how the bike looks on the road.
Welcome guys back to another blogpost. I had the honour to be part of the grand opening of Joyn Zürich. I will be living here for the foreseeable future, so I thought I will give you a room tour – a tour of the whole building actually – which has so much to offer. Let’s go!
The Check In
When you get in the first thing you see is a self check in. That’s a big advantage to other buildings, because you don’t have to wait. You can just check in with your Joyn card, which you will get at the start of your stay. You can use it for checking in and for the elevator.
Also you will see the working area and a Workspace area, which I will tell you about a little bit later on. If you have any questions, there also are host counters, where you can get your answers.
Key Data
Maybe I can answer a few of your questions already. The Building Joyn Zurich has almost 500 rooms to stay in. 104 hotel rooms and the rest are normal apartments. The big difference here is the kitchen area which only the apartments have.
The building is completely new and only 20 minutes away from the airport and 20 minutes away by train from the city centre. You only have to use one train, no stops in between, it’s really comfortable to get into the city. Also there is a garage to park your car in, but we will come to that later.
Now let’s talk about the different types of rooms they are. There are Studio+ rooms, studio rooms and the smaller rooms.
Studio+
We’ll start with the Studio Plus room, which is the biggest room available. It has roughly 40 to 50 square metre of living area.
The great thing about the Studio Plus room is the fully equipped kitchen. You have for example an automatic dishwasher and a microwave. Besides that the kitchen is fully equipped, you don’t need anything to bring with you. The same goes for the rest of the apartment. It is fully furnished and you even have a smart TV with Netflix and YouTube – anything you may need.
But of course not everything is fun. Joyn is also for business travellers, so you have a – again – fully equipped working area inside your private room. There are chargers right where you need them and some space for books or laptops or anything you might bring with you work wise.
Let’s say you are done with a long day of cooking, watching Netflix and working. You need to sleep. It goes without saying, but every apartment has a beautiful sleeping area, which you can actually transform into a bedroom. How do you do that? By pulling two curtains and splitting the room into two different parts: a living/working area and a bedroom.
But wait, there’s something missing, isn’t it? Right, a bathroom! Everybody needs it. The spacious bathroom in this apartment is roughly 5 to 10 square metres big, with a huge mirror and a rain shower. One of my favorite features here is actually the laundry bag, which comes free. Everybody has to do laundry and everybody hates to go outside to laundry shops to wash. So this feature Joyn provides is what I want to tell you about next.
Laundry room
Joyn Zurich offers a laundry room. There are several washing machines and dryers in it, so everybody can wash their laundry when they need to. And the best thing is: you don’t need any cash. Also you don’t have to look at the time, because when your laundry is ready, you will get a notification on your phone.
Having said that let’s go to the studio apartment, which is one size smaller than the Studio Plus apartment. It has also some nice features.
Studio
The biggest difference between the studio and the Studio Plus apartment is the size, obviously. Except for that it’s basically the same apartment with a fully furnished living area and a fully equipped kitchen area, a dishwasher, a Smart TV and so on.
Cleaning Service
One big feature I didn’t tell you about until now is something for our lazy people out there. I know you exist and I know I am sometimes one of you. 😀 Joyn offers a weekly cleaning service. They clean your room, they change your bed sheets, give you new blankets and towels – everything you might need.
Every room in Joyn Zurich is equipped with one marshall speaker, which is really cool. Also there is one room in the building, where you can choose from different decorations and bring them up into your own private room. That way you can really get your own touch and feel at home.
Smart+
Smart+ is a bit smaller than the studio apartments, but just right for a simple stay. Also just as equipped as the other rooms. A big advantage of those rooms is that you have a little Terrace where you can enjoy the air and look at the nice courtyard.
Smart
For those that do not need a terrace and much space the apartment type „smart“ is right fit for. It’s the smallest apartment but offers the same features (SmartTV, fully equipped, cleaning service, private working desk, etc.).
Co Working Area
Right at the start I teased the Co working area at the ground floor. If you don’t want to work by yourself in your room, you can come down here and work in a big space with many other people, if they choose to do the same. There are different kind of chairs and couches, each with chargers and tables for you to work on. Everybody will find the best option for himself or herself in this area. Also there are small meeting spaces, if you have a meeting and don’t want to go into a cafe or fill out a big conference room with only a few people.
From there you can go right to the outside area, where you have several options to sit and enjoy the sun or chill with friends right in the middle of the building.
Basic
The last room I want to tell you about is the “basic” room. This is basically a hotel room, a significant feature of Joyn Zurich. In this room you have no kitchen area, like in most of hotel rooms, but you have a beautiful view over the city. The real eye-catcher though is the view on the roof.
Fitness Area
The most important feature of Joyn Zürich for me is the fitness area. It doesn’t matter if you only want to do some cardio or if you want to do some heavy lifting: John Zürich has it all. From treadmills to dumbbells, you will find everything you need.
We are almost through! The last thing is the garage below the building. It also has, like every part of Joyn Zurich, cool features: for example, the chargers for electric cars.
I will live here for the next 1 1/2 months. I am pretty sure I will enjoy my stay. And maybe I will see one of you guys here soon!
Here you will find the link for the official website of Joyn Zurich serviced living.
Hey guys, I’m back with another tutorial! Now that your hair looks great, we want to make sure your eyebrows do as well. For that I got a little help from my friend Chris again (He is still a great barber😉). He plucks my eyebrows with a thread and tweezers.
From him I learned the right way to pluck them. You have to be careful, so it doesn’t look too feminine. If you like that look, pluck away! But for me it wouldn’t fit.
Step 1: Careful cleaning on top
I have very thick eyebrows, so we started by carefully cleaning out the single hairs on top with a thread. It is much cleaner with a thread than with tweezers.
Step 2: The middle part
Also we did clean the middle part, I am not a fan of a monobrow. 😀
Step 3: Shaping it
To get your eyebrows into a good shape, you need to find their highest point on top first. For that you take a pen or a stick, put it on the tip of your nose and lay it in a straight line over your pupil to the approximate high point of your eyebrows, to really get the detailed point. On that part you DON’T want to take away any hair, because that ruins the face and the eyebrows. Chris did a great job on that. Also remember to do it on each side seperately. 😀
Step 4: Form the eyebrow bottom
The top was done, so we continued with the bottom. Now the tweezers came into play. Again we did it very carefully. You remember the highest point of the eyebrows and how you should’nt take anything away of it on top? Well, on the bottom of that high point you can take away a little bit more, so you get the perfect shape.
And with that you’re done! I have learned a lot on eyebrow shaping, have you? 😊 For more tutorials like that, challenging workouts and exciting vlogs check out my YouTube Channel @fabianxarnold.
Hey guys, another workout is coming your way! This time I wanted to show you a „military workout“ routine. It combines cardio with strength exercises, and it definitely will be challenging, but it also will be worth it at the end. You can add it to your workout routine as a high intense exercise to kill your fat!
Every exercise will be repeated several times within the course of the routine, but obviously I will only explain it once. 😀
Jumping Jacks: Start with high frequency jumping jacks, to get the heart going.
Burpees: Right after that go over to burpees. Jump down to a push up position, do a push up, get up, do a high jump and start over. Try to really get those movements into one flow. It is hard at first, but you will get used to it!
High Knees: To keep the intensity, switch to High knees. Remember: No pause between the exercises!
Mountain climbers: Now this is an exercise most people hate, but I love it! It really gets exhausting after a little while. Get into a push up position. But don’t do a push up – rather pull your knees alternately to your chest, as if you were running.
Punches: Throw some punches! But remember to move your feet. A boxer never stands still. Also lay your whole body into the punch.
Twist Jumps: Jump up and down and twist your hips. It sounds like a dance move and it kinda looks like it as well. 😀
Kick Throughs: They are pretty similar to mountain climbers. The difference is that you don’t pull your knees up to the chest, but kick your legs below your body through to the other side. Your right leg to the left and your left leg to the right.
Push Ups: Those almost feel like a relieve after those burpees, right?
Push Up Hold: Now hold yourself down in that position, arms tight to the body. It burns!
Plank Hold: Keep holding! Your body has to be a straight line.
Squats Jumps: Now again something for your legs. They work just like normal squats, but when going up, you jump! Try to get a smooth movement here, similar to the burpees.
Side Plank on each side: Try to keep your body straight, it has to be one line, tense your whole body.
Jack Knife: Lay on the ground and stretch your body out. Now, while keeping your arms and legs straight, get them together in the middle.
Squat hold: Just like squats, but hold! Try to go deep.
Squat Twists: This is a mixture out of Jump Twists and Squat Jumps. Do the squat jump first, then switch to the right by pulling your right leg back and your left leg to the front, almost as in a deep lunge position in yoga. Then come back to the middle and after that to the left.
Plank up and downs: You thought plank was hard? Try going from a plank position to a push up position and back.
Walk up and down: Unleash the animal inside of you! Walk on your hands and feet up and down. Try to keep your body tense.
Lunge kicks: Last exercise! Do a deep lunge and kick out of it with your back leg!
And that’s it! Feeling exhausted? Good! With each time you will get used to it more and more, it will show. 😊
I hope you can make this workout part of your routine. For more workouts like this, hair style tutorials and vlogs visit my YouTube Channel @fabianxarnold. Take care and see you there!
Hey guys, welcome back! I cut my hair … AGAIN! This time I did a completely different cut. I shaved off the sides and made the hair on top a bit shorter, but still rather long. That way I can style it in many different ways: to each side, flat or with volume. Of course I didn’t cut is myself, my friend Chris was helping me out. Excellent barber!
Before we were ready to get going, we had to wash the hair. But I guess you already know that from your own barber 😉.
Step 1 – rough form sides
To get the rough form in, we started with the sides. We shaved them to a particular length, so we could still adjust them later on. Don’t get them too short!
Step 2 – fading up
When we got the right length on each side, we continued by cleaning the outside and started fading up. That’s the reason I told you not to get it too short from the beginning. The way we did it, we could still adjust the fade. We started with 12 mm and went up to 20, which isn’t that short for sides, but in comparison to my longer hair on top looks really cool. Find out, what length fits you!
Step 3 – top
Cut the top. The top hair, of course! 😉 We really cut a chunk, because my hair was already so long, it had to be done. But you can play with the length. Again, find out what works for you.
Step 4 – thin out
Because I have very thick hair, we thinned out the top. Doing that allows me to actually style my hair in any direktion I want to. And it will grow back anyway. 😀
Step 5 – clean the back
To finish up, we cleaned out the back, so that it doesn’t look as „round“ anymore.
Step 6 – Styling
Styling: Here is where the fun begins! We started by using sea salt spray, because my hair still was very thick and heavy and falling in any direction. With blow drying that spray in, we gave it more texture, so it was much easier to style afterwards. Then we continued with dry shampoo, which gave my hair even more texture, more grip and more volume. Now it gets interesting. After we applied the hairwax, we used hairspray to make it hold. But we didn’t do it the ordinary way: Chris sprayed it on his fingers, going through my hair afterwards.
And thats it! A look that everyone can wear and that’s very versatile. I hope you enjoyed this post and I could give you some useful advice.
Hey guys! I hope you are all doing well. Today I want to talk to you about one of my favorite warm up and cardio exercises: Rope skipping. All you need for that is a rope. That’s it. A rope.
Why is it so useful?
Rope skipping trains strength endurance, because the bouncing in place is very intense. It also promotes the coordination of different muscle groups than those you would use while running, for example. In addition to that, rope skipping supports the interconnectedness of the two hemispheres of the brain. As soon as a movement goes beyond the centre of the body, like crossing the arms in front of the body, the two halves of the brain have to communicate. It strengthens your skeleton as well and protects you from injuries. Enough good reasons? Let’s go!
How to do it correctly
First, adjust the length of the rope a little bit higher than your hips. Then start with normal rope skips. Be sure to use both legs, one time under per jump.
When you are comfortable with that, start a bit of a variation, for example only use one leg while jumping.
Again, when you feel comfortable, switch to changing legs per jump.
Of course you can always increase the intensity, if you want, You can do that by skipping. Simply pull up your knees while changing legs.
If you are a more advanced ropeskipper, try doing a double under, by draggy the rope two times under per jump. This requires advanced coordination and also increases the intensity a lot.
You are even more advanced? Great! Try implementing side swings in you ropeskipping routine. Here the interconnectedness of your brain comes into play. While doing normal rope jumps, swing the rope alternately on each side of your body. Then try to come back to normal rope jumps. It’s not as easy as it looks.
Speaking of easy, why not do cross swings? While doing normal jumps, cross the rope with your arms. This requires a big deal of coordination and strengthens your arms as well. But be careful not to get tangled up.
You mastered the previous exercises with ease? Or … you mastered them? Very good, now try forward and backward jumps. One leg always stays up front, while the other stays back. Now jump back and forth between the two.
Almost done! The last exercise is the scissors jump. It is quite similar to the forward and backwards jumps, but instead of jumping back and forth between them, we are using both legs, only switching their positions. So with each jump, the other leg gets to be up front.
Nice, you did it! I hope you had fun with that exercise, I certainly did. You can’t get enough of my workouts? Just go to my YouTube-Channel, for each muscle group there is a fitting workout.
Hey guys, welcome back! Today I want to talk about a very important asset to a man’s face: the beard.
When I was younger, I dreamed of having a real „man-beard“. Well, I am slowly getting there. Now I want to show you how I shave it, so it looks like a proper beard.
Before shaving
It is very important to let your facial hair grow for some time, even i fit looks horrible. To get the best out of it, you have to have something to work with. I try to work with one centimeter, that takes me about two weeks to grow.
Rough shave
I use a beard trimmer with millimeter adjustments, so I can be very precise. I always start with 5 millimeters and do a rough shave against the beard line. I start at the middle and do the sides after that (I go up until the middle of my ear, but you can change that up). Try to stretch your face a little bitt o reach every part of your face, otherwise some tiny hairs may be overlooked. The moustache comes last. Here I adjust the trimmer to 4 or 3,5 millimeters.
If you have parts of your beard that are darker than the others, trim it a bit shorter, so it looks like it is the same length.
Details
After doing a rough shave, you have two options for the details: 1. Use a dry, electrical one blade 2. Use a wet shaver I normally start with the dry blade and do the lines of my beard, later I clean everything up with the wet shaver.
To do the bottom lines on your throat properly, put one finger right where the chin ends and the throat begins. This is where you want to have your line. From there you go tot he sides and up to get a clean cut just along the transition of your chin to throat.
Some people (like me) don’t have that much facial hair on the sides. So I try to shave everything above the visible hair and create an intentional line that way. I basically draw a beard into my face. 😀
After that clean everything out with shaving cream and the wet shaver. Remember: Always cut up to down, otherwise you might destry your skin.
Aftercare
When you are done, wash the remaining cream off with water and dry your face with a towel. Don’t rub it in, but rather dab and press it against your skin. That way it is much more skin friendly.
Having done that, it is time to use after shave cream. I don’t really use proper after shave with alcohol in it, but natural products with aloe vera inside. Again, don’t rub it in, but rather to little dabs.
And after that, you are done! I hope I could help you with your beard routine and some of you will walk around with a massive beard shortly. 😀
Hey guys! Aso you know, I have uploaded and several workouts for you to try out and insert into your daily routine. Many of you guys tagged me in your own workout videos. I love to see you guys putting in the work and I am happy that I can help you with that.
Now I wanted you to do a special challenge with me: The plank challenge. Yes, I know, many people absolutely hate that exercise. 😀 But there is no better way to strengthen your body centre, especially your back and abs.
How to take part
I have recorded a video of me doing the plank challenge, you can find that below and on my YouTube Channel @fabianxarnold! If you want to participate and challenge me, simply record a video of you doing the challenge with me and tag it with the hashtag #challengefabian ! Do you have, what it takes, to keep up with me? 😉
This challenge will go for one week. During this week I will repost the best challengers!
I am very curious to find out, who will step up. Actually, I can’t wait! If you want to see more workouts, visit my YouTube channel @fabianxarnold. There you will find a burning abs video as well.