Hi guys, finally I have a new hair tutorial for you. Stay tuned and learn how to style your hair perfectly for any occasion as a man. Currently I have a few highlights on the top and my hair is a little longer. So this tutorial is perfect for those who want to tame their wild mane. Learn now how to make the TikTok hairstyle work for you.
Step 1
If you start with freshly washed hair, the first thing you need to do is dry your hair. The top of the hair can still be a little damp, but the sides and back should be completely dry. When washing, you should use high quality products that nourish your hair. I use conditioner every day, shampoo every other day and once a week I apply a hair mask. In addition, I also use some hair oil from time to time. Currently I use the products of Fable & Mane /ad non-paid.
Step 2
In the next step, I apply some volume foam. Therefore I use a product from Syoss / ad non-paid. For this I use about a handful of foam, distribute it in my hands and then apply the foam in my hair where I want to have volume. Since I like to have volume in the front, I apply the foam predominantly on the front. I also add a little to the sides and back. To make sure it has the desired effect, I rub the foam and make sure it reaches the roots, because it is from them that the volume is generated. Currently it looks like the typical surfer style hairstyle. That’s why I’m already moving on to the next step.
Step 3
To avoid a wet look, I blow dry my hair using a brush. It is important to use the hottest temperature level, but not the strongest level. I roll my hair up with the brush and dry it from down and the top. In this step, do not hold the hair dryer in one place for too long, otherwise the hair will dry out. Now repeat the same with the side. After I’m done with the top hair I repeat this step with my right and left hair parts as well. In the end the rest of the back of the head must be blow-dried. Here I use no brush, but simply my hands to speed up the process.
Step 4
Now a little bit of a matte paste can be applied. I don’t use hairspray or hair gel, for example, because I don’t want my hair fixed, but rather a natural look. Here I use the “Strand Matte” matte paste from got2b /ad non-paid and the molding paste from Forte /ad non-paid. In this step the hair can be simply messed up and moved backwards and forwards. Then I tiny it up at the sides and roll it up in the front.
And now my TikTok hairstyle is ready. I hope you like the result. Tell me about your thoughts and your suggestions for improvement in the comments.
Hey Guys, as you probably already know from Instagram, I finally got my visa and my dream to move to LA is becoming a reality. You can’t believe how happy I am. To give you a better insight into my situation and to help you understand my decision even better I thought of doing a little Q&A with you to clarify the questions I keep getting asked. Be curious – maybe your question is included.
First question: I think the most frequently asked question is actually, why are you moving to LA?
The dream has already manifested itself about three years ago – 2019 with me. At that time I just lived in Australia and started modeling. From a purely business perspective, LA is a goldmine for modeling. Most big campaigns are shot there and most world famous photographers but also stars and starlets learn there. Recently LA has also become the place to be for TikToker, which of course suits me very well. And as you all know: Hollywood film productions are also from LA. In addition, my mother agency also sits in LA, which is why it was then only offered to work towards my artist visa – and as just announced, I have taken three years for the full approval and can not wait to start now.
2nd question: How long are you staying in LA?
I haven’t planned exactly yet, but I know that I will stay there for a long time. My talent visa is for three years so I have the opportunity to reach my full potential there and who knows what will happen. Since I don’t have an apartment in Germany anymore, I don’t know where I will move to after that time. Maybe I can extend my visa, maybe I will go back to Australia or maybe I will go somewhere else. Currently I have no countered plans. But of course I want to enjoy the first months in LA and see if I can imagine spending such a long time there.
3rd question: Are you going to Coachella?
Yes, I’m going there. We’ll be there the second weekend, since we’re not flying to LA until 4/21. Then from the 22nd to the 26th I’ll be there with some other influencers and friends. After Coachella I’ll be staying in an Airbnb until I can finally move into my own apartment in LA on May 1st.
4th question: Are you moving alone?
Since we’re going to Coachella first, of course I won’t fly alone but my journey will continue alone afterwards.
5th question: Are you excited?
Since 2018 was the first time I’ve been so far away from home, I’m not that excited to be there anymore. For such a long period of time, of course, I have never been away but in 2018 and 2019 I was on the road for a total of 1.5 years which fortunately takes away my anxiety. So I am only positively excited and full of anticipation.
6th question: Why don’t you go to Australia?
I love australia. it’s my favorite country and I liked the whole mentality and life there more than enough. So I can say that Sidney is definitely my favorite city so far. But I don’t want to commit myself. Currently I’m single but of course I want to make that dependent on my future partner and see where she comes from, where it drives her and who knows maybe we will grow old together in Australia. But for fashion modeling and acting, so for the current stage of life Sidney is just not so well suited, so now LA is first on the plan. Everything step by step.
7th question: Are you going to auditions and do you already have a role in LA and will start filming?
No, that’s why I will go to such castings, of course. As I already said, I have my agency in La and they will of course support me in getting a foothold in the film industry and finding a good film agency.
8th question: What is so great about LA?
I was already in LA for two months in 2019. I didn’t really like LA there if I’m completely honest. For me it was dirty, I didn’t meet as friendly and open people as in Australia but the opportunities there are indescribable. When I’m in LA I can develop my career as fast as nowhere else.
9th question: How can local photographers work with you?
You can always reach me through my email. If you contact me via Instagram, the DM might get lost, so it’s better to go the old-fashioned way.
Tenth question: How will you move around LA? There is hardly any public transportation there.
The last time I was in LA I took Uber a lot. But since I plan to stay longer this time I think I will buy a car.
11th question: Will you visit Las Vegas?
The last time I was in LA I was in Las Vegas for two days. This time some of my friends want to visit me in LA and we are already thinking about doing a boys trip to Las Vegas.
12th question: What did you prepare to move to LA?
If I am honest not much. I am not good at planning. I just booked my flights, took care of accommodation and of course my agency is there. I haven’t even packed yet, although it’s going to start soon.
13th question: Are you moving to LA for professional reasons or for self-realization reasons?
As I just answered, this is a professional decision for me to take my business to the next level. If it was just about being freer and developing personally I would probably go back to Sidney.
If it was just about being freer and developing personally I would probably go back to Sidney.
14th question: Will you live permanently in Los Angeles or will you go back to Germany?
As I just mentioned, I am quite flexible. I like to drift and would like to see who I meet in LA and how the whole situation develops there before I make a decision.
15th question: What do you expect from your move to LA?
Again, I don’t have a clear answer for you because I have to let LA as a place to live sink in. However, my dream would be to get a foothold as an actor there and star in a Netflix series like Vampire Diaries.
16th question: Will you focus more on modeling or acting in LA?
I think I will focus more on modeling at first because it’s easier to get started. Acting is a hard place and if I focus only on that, the chance of really succeeding in LA is too low. I mean everyone wants to make it in Hollywood as an actor.
17th question: What is so special about LA?
I think LA fits my vibe very well. I’m more of a beach boy type of guy who likes to do sports and I think that fits LA well. Also my work as an influencer and generally my work in social media fits well the vibe of the city. For example, I don’t see myself long-term in a business city like New York where everything is very classic and stiff.
18th question: What does being a model mean to you?
This doesn’t necessarily have anything to do with my move to LA but it’s still a very intriguing question. Personally, I can say that I have become very self-confident through modeling. The fact that my appearance, or modeling finances my life impresses me again and again. And I am grateful for it. Since I concentrate on my goals and shape my body as I need it in my profession, a lot has changed.
19th question: What will you miss most about Germany?
I think it will be our bread. That’s what I missed most in Australia, too, if I’m honest. But most of all, of course, my family.
20th question: Do you already know people in LA?
Yes, I know some people in LA from my last trip in 2019.
21st question: Do you have a bucket list for the USA?
I would love to visit New York. Washington is definitely on my list as well though. Miami, Florida in general but also San Francisco I would like to see. Maybe Texas as well – something more unusual I don’t know exactly why but I want to do it.
22nd question: What is your dream place to be?
In LA, Runyon Canyon and generally in the world – Sydney.
23rd question: Is your brother coming with you to LA?
No, but he will definitely come to visit me.
That’s it. I hope I can give you some helpful answers. In one week I’m going to Coachella – I’m so excited. You guys too? Stay tuned. Of course I will take you there as well.
Hi guys, today I will show you a glimpse of my workout routine. The last time we trained together legs, today is the chest turn. So that the complete chest area is also addressed, I also train the shoulder and triceps. Be curious and learn how to exhaust your chest muscle most effectively in the gym.
Warm Up
At the beginning of the workout I do 10 minutes of cardio. I deliberately go on the stepper because I move my arms here in addition to my legs and thus also warm up my chest and back. After that, I stretch with a resistance band and then it’s off to the machines.
Shoulder Resistance Band: 3 times inwards (20 reps) 3 times outwards (20 reps) 3 times up and down (20 reps) 3 times backwards (20 reps)
The only important thing here is that the band is very flexible, as this is the best way to warm up the shoulders. During the exercise it is important that the upper arm does not move and remains rigid. The movement should be made exclusively from the forearm. The execution is ideal when the arm is at a 90 degree angle. When we are done with one arm, we switch and now push outward. This is a little more difficult, but after a little practice you can do it well. For beginners it makes sense to hold the upper arm with the other hand to avoid too much movement.
1st exercise: Bench Press
Our first real exercise is push ups with the barbell. Since I have quite long arms, I hold the bar far outside. But you can vary this depending on arm length and preference. Here, too, it is important that there is a 90 degree angle in the movement. To clean up, you can first do a set without weight. Here you can then also go a little deeper than normal to completely exhaust the muscles. But never go too far down, otherwise you can injure your shoulders. So you don’t have to touch your chest.
In this exercise we do 5 repetitions with weight:
First Set: With the bar (20 reps) Second Set: 60kg (12 – 15 reps) Third Set: 80 kg (8 reps)
Fourth Set: 85 – 90 kg (4 – 6 reps) Fifth Set: 80 kg (4 – 6 reps) Sixth Set 50-60 kg (as much reps you can)
As you can see, the progression here is similar to the squats. During the first repetitions the weight increases and towards the end I take it down a bit to use the last forces and tear the muscle completely.
2nd exercise Dumbbell Press
The next exercise we do on the dumbbell press. Here I will do 3 sets. The same principle applies here: First increase the weight and then perform the last set with less weight. In between the three reps, I always do as many push ups as I can. Normally the muscle would rest in the break between the sets, but these supersets make the muscle work even better and save you time by combining two exercises.
First Set: A lot weight (6 reps) Second Set: A lot weight (6 reps) Third Set: Less weight (many reps)
In the exercise, it is important that you do not go too much in the direction of the head when going down, but rather stay at the level of the chest. Again, a 90 degree angle should be maintained. What is also very important in this exercise is the position of the bench. This should be set at a 45 degree angle.Many people set the bench too low, so you can hit the desired muslin but not ideal. In our concentrated set, we lift one arm at a time to make the movement more controlled than before.
3rd exercise: Flyings
After the exercise we continue with flyings. Here too we do 3 repetitions. Here I always try to set the seat of the machine as low as possible, so that my hand is a little higher than the nipple line.
First Set: Find your weight (12 reps) Second Set: A lot weight (8 reps) Third Set: Much weight (many reps as you can)
During the exercise, I try to target the mid and upper chest, as we will be doing dips afterwards that are more targeted to the lower pecs. The most important tip here is simply focus: perform your exercises slowly and properly and focus on the muscles you want to target to get the best possible results.
4th exercise: Superset Dips + Handstand
Now follow the already announced dips. Here we also do 3 sets. The number doesn’t matter here: the more the better. So even if it’s already very much at the end of the workout, try to get everything out of it.
In the superset I do three sets of handstands for 45 seconds each. Another version of the handstand is to do it facing the wall. This makes the execution much harder and the handstand even more effective. If you can’t do a handstand you can either try to do it with help or alternatively do shoulder presses. If you do shoulder presses it doesn’t matter what weight you use, again it’s just a matter of pushing the muscle as hard as you can through many repetitions.
For dips, many use additional weight to their own body weight. I never do that, because I don’t want to get bigger because of the modeling, but only more defined. So it depends on what you want to achieve.
After that we do another set of side shoulder raises. Again, we do as many repetitions as we can. When doing this, make sure that when you go up, you move your thumb down to address the middle part of the shoulder.
Last exercise: Triceps
Finally, I’ll do a triceps exercise on the cable pulley. It’s always important for me to lean back a little so that I can see my arms better and concentrate on the correct execution. As an alternative, you can also lead the cable pulley over your head and perform the exercise the other way around. If you really focus on your muscles during the exercise, it’s enough to do an exercise where you target the trizeps.
If you have any questions, feel free to ask me in the comments. Otherwise, I look forward to your reactions and have fun imitating!
Hey guys, as already announced in my last video I’m in Mallorca right now. My videographer Michel is with me again and we opened a small workspace together with my friend Elias from www.dreamdestinationfilms.de /non paid Ad.
Besides all the work we have to make sure that we stay fit. I have already filmed my six-pack routine for you. https://youtu.be/ibayU72uWFw
Today it’s the turn of the legs. Have fun sweating!
This time it is not a home workout but we train in the gym.
Warm Up
To warm up, we start with some cardio. My favorite thing to do is to ride a bike. Today I start with 20 minutes at speed 12, but I generally never do much treadmill because I have knee problems and that puts too much stress on my knees.
1st exercise Squats
After the warm up we started with our first exercise: squats. To not overload our muscles we start with a set without weights, only with the bar.
To perform the exercise perfectly, I have a simple trick: Always use a towel to avoid the bar from hurting your neck. Normally there are some black rolls as well to avoid pain but for me it works way better with my towel. If you are wearing running shoes it is better to take them off to generate a more secure stand. In this exercise it is important to keep your back straight. To make this easier, it helps to look up a little while doing this. To put a little more pressure on your muscles you can bounce a little when you get to the bottom. In this way you will fully stimulate your muscles. It is also important to keep your knees behind your feet.
If you are training with a friend, you can use the time he or she is training to stretch a little. However, if your friend needs help, you can stand behind him or her during his or her session, so the back can’t slip into a bad position.
Now you can see a small overview of our training session. As I mentioned before, I like to start with no weight and then slowly tease my muscles out by increasing the weight. At the end I do one more set with less weight and exhaust any energy my muscle still possesses. In general, it is important to train until the muscle is exhausted. However, if you are still starting out, it is better to use less weight and make sure to perform the exercise correctly. This is effective and will lead to more success in the long run. It is also important to use clamps on the edge when squatting with a lot of weight. This way you can make sure that you don’t injure yourself during the exercise.
1. Exercise – Squats
First Set: With the bar (20 reps)
Second Set: 50-60 kg (12-15 reps)
Third Set: 80-90 kg (12 reps)
Fourth Set: 100 kg (8 reps)
Fifth Set: 110 kg (12-15 reps)
Sixth Set: 60 kg (12 reps)
2nd exercise Lunges
After that we got a small elevation to perform our exercise on. This not only trains the balance but also shapes the buttocks. As a beginner, make sure you start with less weight so that your balance doesn’t suffer.
In this exercise you take the bar like in the squats and do lunges forward. This way you train only one side of the butt which is very effective and exhausting. Also here it is important to go down straight, slow and stable. The execution is perfect if you have a 90 degree angle when going down. Since it trains only one side it is important to make sure that you have two repetitions in one set: One for left and one for right.
2. Exercise – Lunges:
First Set: 60 kg (10 reps each site)
Second Set: 60 kg (10 reps each site)
Third Set: 60 kg (10 reps each site)
3rd exercise Leg Hamstrings
After that, we continued with Leg Hamstrings. For this we used the device provided for this purpose. Here you can always orient yourself on the position of the bar. The bar must be positioned exactly above your ankles so that you get the best results. This is important, because otherwise the roller will rest on the Achilles tendon and can quickly cause injuries. Throughout the exercise, you should look up a bit to get a straighter back.
4th exercise Leg Extensions
For the next exercise we use a machine again – the leg extension. Here it is important to sit up straight and make sure that your back is straight. The knees should protrude a bit above the seat. When you go down with the roller, your legs should be at a 90 degree angle. The same rule applies here: if you have less experience, use less weight.
There are two different versions of the exercise. You can stretch the feet or pull the feet to you.
4th exercise
First Set: Choose your weight (12 reps)
Second Set: Choose your weight (12 reps)
Third Set: Choose your weight (12 reps)
5th exercise
After that we started to train our calves. There are many different exercises for this. You can sit or stand up straight like we did. Here it is important that your upper body does not move, so it is very stable. The legs should be a little bent, not straight.
5th Exercise – Calves
First Set: Choose your weight (12 reps)
Second Set: Choose your weight (12 reps)
Third Set: Choose your weight (12 reps)
Should I take supplements?
After a workout, many people tend to take supplements, but this is not always necessary. With my normal food I already cover the necessary protein intake. The rule here is that you need 2g protein per KG. To grow a little stronger, you can of course use supplements for support. After training, it is advisable to take BCAA, for a faster recovery.
What should I eat before and after a gym session?
If you train in the afternoon or in the evening you should eat something before your training to have more power. But when I train early in the morning I quit breakfast and just have a banana afterwards. After a workout you should always eat something with sugar to help your muscles recover better and faster. Fruit is perfect for this.
I hope you could learn something and now you have even more motivation to go to the workout. In the next few days I will do a shoulder and back workout. Be curious.
—————————————-———————————-----
On my channel you will find videos about modeling, men’s fashion and style, men’s hair, health, fitness, overall lifestyle, and of course, my personal life. This includes my friends and family, so please be mindful of that and maintain a positive atmosphere in the comments section. Don’t forget to subscribe and make sure to hit that like button if you enjoyed the video!
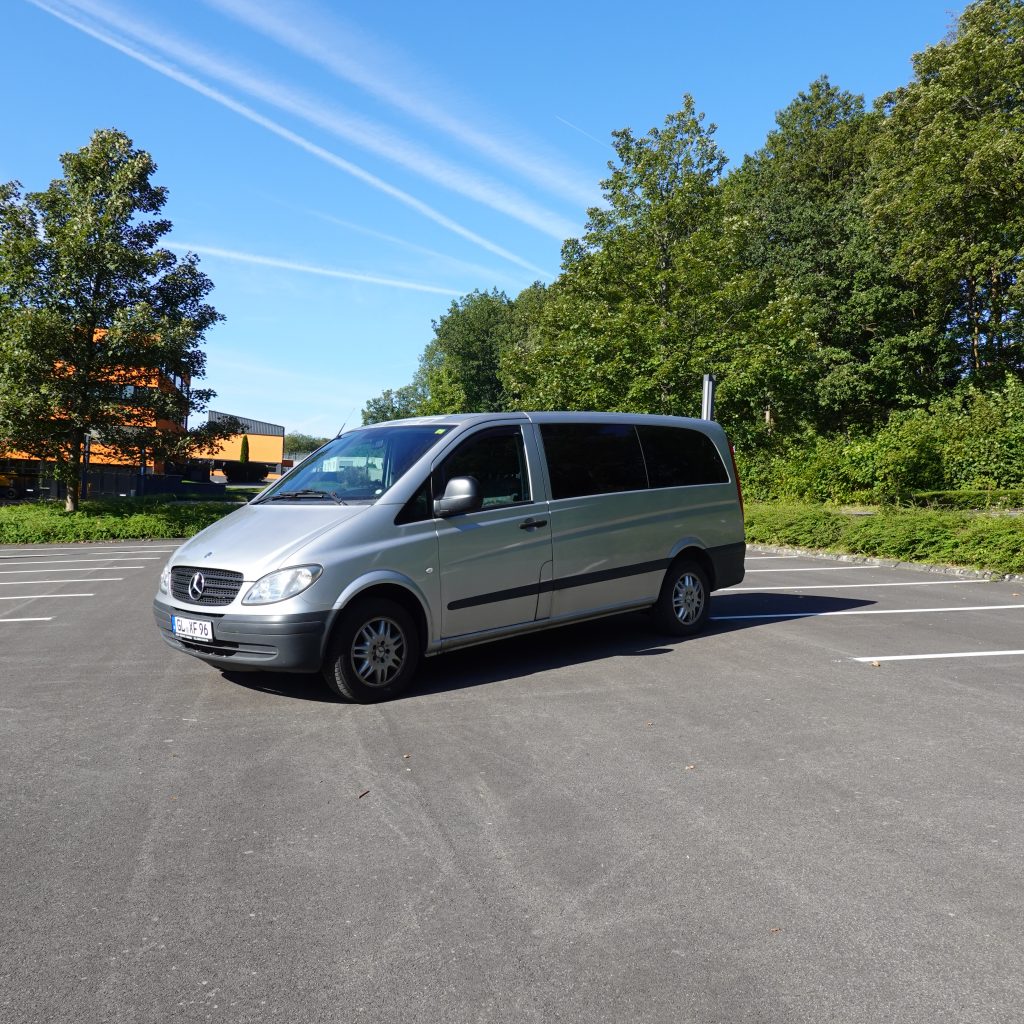
Hi guys, I spent the last months converting this Mercedes Vito, year 2007, into my dream campervan. And I can tell you: The result is outstanding. Of course I have accompanied the conversion work for you. Step by step you can now follow the transformation. I hope you are at least as excited as I am.
Mercedes Vito 2007 – before conversion
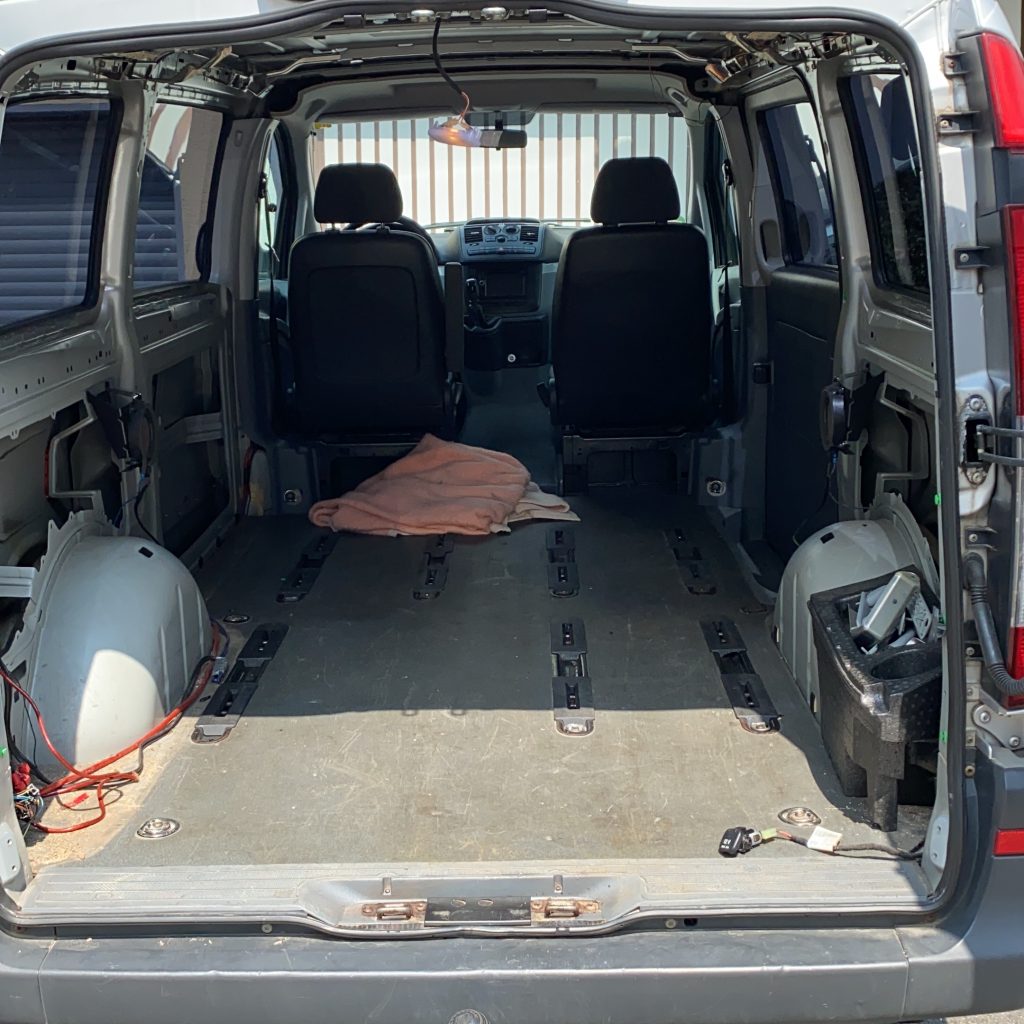
Step 1: Rip it out
Logically, I ripped everything out of the van first.
Step 2: Soundsystem +Navigation
After that, I first replaced the speakers on the side and then the navigation system. Therefore Just Sound sent me some equipment and more precisely my sound and navigation system, as well as an Insulation for better sound. It’s amazing. To find out more about Just Sound, here is the link for you:
Then I insulated and re-clad the Van. Before I put the heat isolation on, I used an isolation film for a better sound. It was pretty easy to install, due to the fact it is self-adhesive and sticks automatically to the roof and the sides. Afterwards I got some Armaflex 19mm isolation, which I installed on the sides and in the ceiling. This one is self attaching as well.
Step 4: Sides and Ceiling
Next, I cut, painted the wood white and installed it, with the help of my dad, at the sides and the ceiling. The bottom I stopped myself until the end.
After Step 1 – ripping everything out
Step 5: Floor
I used a PCV carpet for the bottom. Here it was important to me to find a floor in wood look and one that fits from the stability, because it can not be too soft, otherwise you would see the footprints after a while. I also trimmed the bottom to fit perfectly on the floor. Of course, I had to pay attention to the cutouts for the seats and other details. To be honest, I had some difficulties with this at the beginning, because the floor did not fit in all places right away. But in the end everything worked out. After all, we must not forget that this is a DIY project, where of course not every millimeter can be perfect.
Step 6: Foiling – Van Design
Since I traveled to London on business, the project had to rest for two weeks. After my return, however, I continued working directly and my Campervan was polished by the Foliencenter NRW. As a motif I have chosen a black and white camouflage pattern, on which the logos of my companies are integrated. If you also want to foil a car according to your wishes, I can highly recommend the Foliencenter NRW. Here is the link to the website, if you want to get more information: https://foliencenter-nrw.com / Advertisement.
Step 7: Tyres + Details
And then the last step has already begun. I got new black 18 inches tires and a bull catcher.
And now my Capervan is finally ready. I hope you like the result. Tell me about your thoughts and your suggestions for improvement in the comments. –> RESULT ON YOUTUBE
If you have any suggestions or ideas for new videos, just let me know in the comments. Until then, have a great time and see you soon! FABS
Hey guys and welcome back to another hair tutorial! This time with my short hair.
I went to the hairdresser, because I didn’t like my long hair anymore. I haven’t done a hairstyle tutorial with this haircut yet, so let’s go! It’s like 5 mm on the side and a normal boy’s length on top.
Step 1: Wet the hair
Wet your hair and start raising it up a little bit, because we are going to use volume foam later on.
Step 2: Volume foam
It doesn’t really matter which product you use. Take a hand full – that’s enough. After that you use the hair dryer and hair brush to style it. Take the brush and roll it into your hair, creating a toll in the process. Then you dry it with the hairdryer. But watch out: don’t get too close, because if you do, your hair dries out and tends to break easily. Analyze the direction or the swirl of your hair. It doesn’t make any sense to force it against ist natural direction.
Step 3: Dry it
When you are finished with your brush, your hand takes over. Dry your hair with the hairdryer.
Step 4:
When your hair is nice and dry, the matt paste comes into play. It doesn’t really matter what paste you use. Take some in both of your hands and really mess up your hair. First mess it up and then tidy it up.
Et voila, you are done!
If you have any suggestions or ideas for new videos, just let me know in the comments. Until then, have a great time and see you soon!
Hey guys, welcome back! Today I want to show you my daily hair routine, let’s go!
Many people ask me these three questions: – Which product do I use? – How often per week do a shower? – What are the steps of my daily hair routine?
Which Products do I use?
Right now I’m using the products of Fable and Mane. I use the shampoo, conditioner, the mask and the hair oil. They keep my hair strong and hydrated. The link to the products are of course in the description of my YouTube video.
How often per week do I shower?
I shower almost everyday. I’m going to the gym and sweating, so it is really necessary. I wash my hair everyday, but I don’t use shampoo everyday. That way my hair doesn’t dry out. When I don’t use shampoo I only use water and conditioner.
My hair routine
Before the shower
Once a week I use hair oil by Fable and Mane. This product strengthens the roots. Fort hat you need partly wet hair. You can either do it right before showering, because you have to rinse it out later, or you can do it right before going to bed, if you shower in the morning. With the oil comes a pipette. You drop a few drops of oil onto your roots and then gently massage them in with a comb. Then you let the oil soak in for at least 5 minutes, I do it overnight. Then you wash it out with shampoo.
Shower
As I said before I use shampoo every second day. Besides other ingredients there is coconut herb in the shampoo of Fable and Mane. It is important that your shampoo doesn’t dry out your hair too much. That’s why you shouldn’t use too much of it as well. Massage it in from front to back and let it soak for not more than 60 seconds. After that, wash it out.
Then I use the conditioner. It softens the hair and strengthens the ends. Again: don’t use too much. Rub it in your hair, not in your skin. It’s a product for the hair, not the skin. Wait for at least 1 minute and then wash it out. It’s important to wash everything out, because if you want to style your hair later and there is still some conditioner in it, it might feel heavy and it’s harder to style that way.
Once a week I also use the hair mask. It helps to hydrate and repair the hair. When you wash it too often and don’t use additional care, it is possible that your hair might get damaged. Let it soak in for at least 5 minutes up to 2 or 3 hours. After that wash it off.
Also remember, if you dry your hair with a towel, don’t rub heavily, but rather try to be gentle. This is much less damaging.
So, this is my hair routine. I hope you liked it and and are able to implement some of those things into your own routine. Definitely check out my YouTube channel and my other blog posts and videos on fitness, styling and modeling.
Hey guys, I hope you are all doing well! Today I want to show you my stretch routine. It helps to loosen up in the morning and before exercise. With just ten minutes it is easy to implement into your day, let’s go!
Hands to the floor:We start by standing up, keeping our legs straight, bend over the upper body and touching our toes. If you can’t reach your toes yet, it is not a big deal, you will get to it. The important thing is to keep your legs straight. If you want, you can stretch out your body a few times in between.
Walking Sun Salutation: Now we put our hands to the floor, walking forward with them, the legs stay where they are. Again, try to keep them as straight as possible. When we arrived in the yoga „downdog“ position (some sort of push up position, but with straightened arms and back), we do the „updog“: Pushing through, straighten our arms and back again, opening our chest, greeting the sun. Then we go back do the updog and walk back.
Groin and butt strech: We start on our knees and do a big step forwards with our left leg. Then we sit deep into it. You should feel the stretch now in your right groin, it’s very liberating. Remember, while doing this, to activate your abs to protect your lower back. When we are finished with one leg, we do the other.
Side leg stretch: We stay with the legs. So we stand up again, bend one leg and lean to the side, keeping one leg straight. Try to keep your upper body straight and activate your middle, that’s very important. When we are done, we do the other one.
Frog position: It looks like the tailor seat, but it is not. Instead of crossing our legs, we put our soles together, creating a pressure and therefore a strech in the groin.
Leg extension stretch: We stay seated, stretch our legs to the front and bend over. It is quite similar to the very first exercise, just now we are seated.
Harmstrings stretch: To make it even more intense and specific we concentrate now on one leg at a time. For that we angle one leg tight to the body, while stretching the other one, leaning over it in the process.
Core rotation stretch: Now it is getting a bit more complicated. When we start with the right side, the left leg is stretched out, while we pull the right one close to our chest, crossing it over the left leg. Now we rotate our upper body to the right side creating a pressure in pushing our left arm against the outside of our right leg. See? It’s easy! 😀
Neck stretch: We stay seated, legs stretched out, upper body straight. Now we lay our hands at the back of your head, pulling it down gently.
Neck stretch sides: The same we do with each side, using only one hand in the process.
Leg extension stretch: Now we stand up again (feeling better already?). While keeping our body straight we angle one leg to the back, grabbing the ankle and pulling it gently. Try to stay straight, it should stretch your upper leg muscles.
Back stretch: Okay, this one may seem a little odd. We sit again and start the motion of a backwards roll. But we don’t actually roll through it. Rather we keep laying on our upper back, our toes touching the floor above our head.
Harmstring Stretch Left: Now an easier exercise again. One leg forward, the other one back, leaning over the stretched front leg.
Shoulder Rotation: This one is very good to loosen up the back. We rotate our shoulders forwards, then backwards, arms on the side.
Body rotation: To finish it up, we rotate our body to each side. Be careful here and only to what feels right to you. After that we are done!
That’s a great way to start the day! I hope you liked this little different approach to a routine and check out all my other workouts, tutorials and vlogs on my YouTube Channel @fabianxarnold.
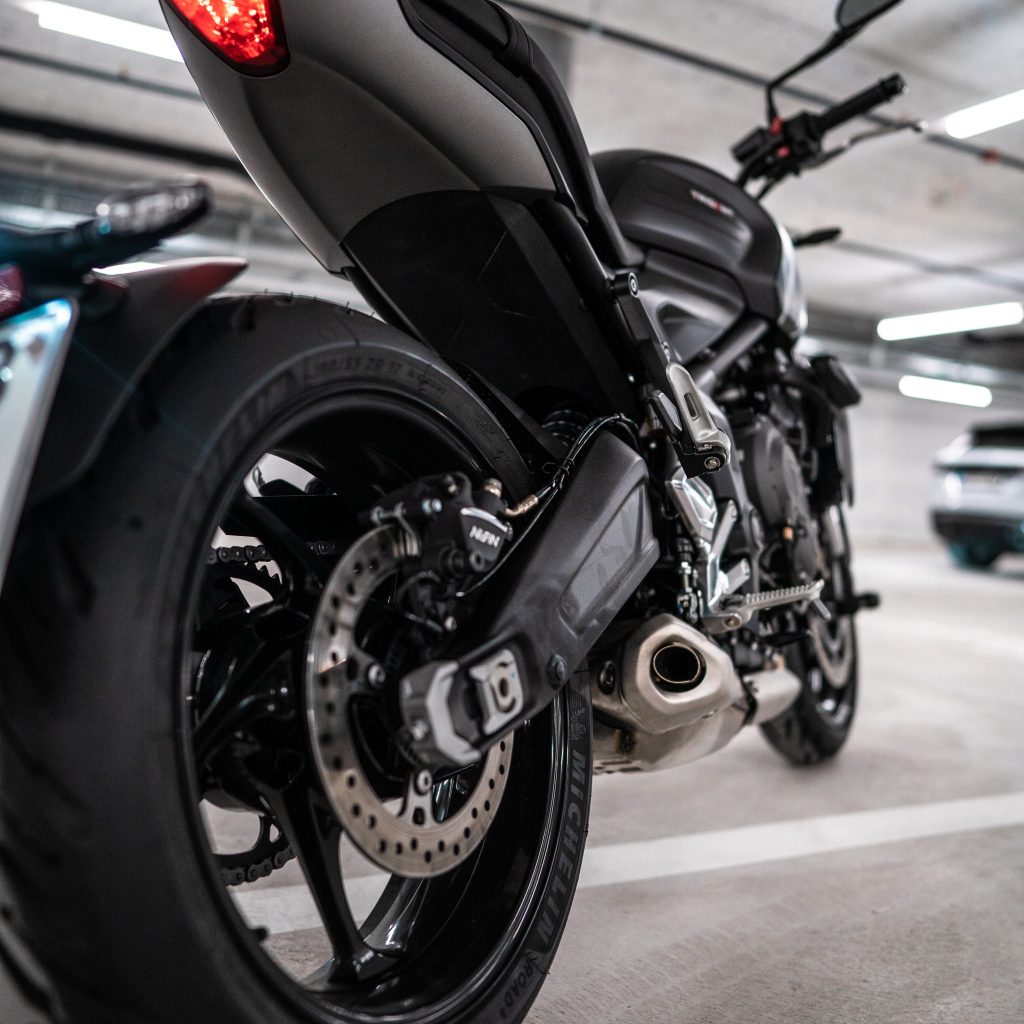
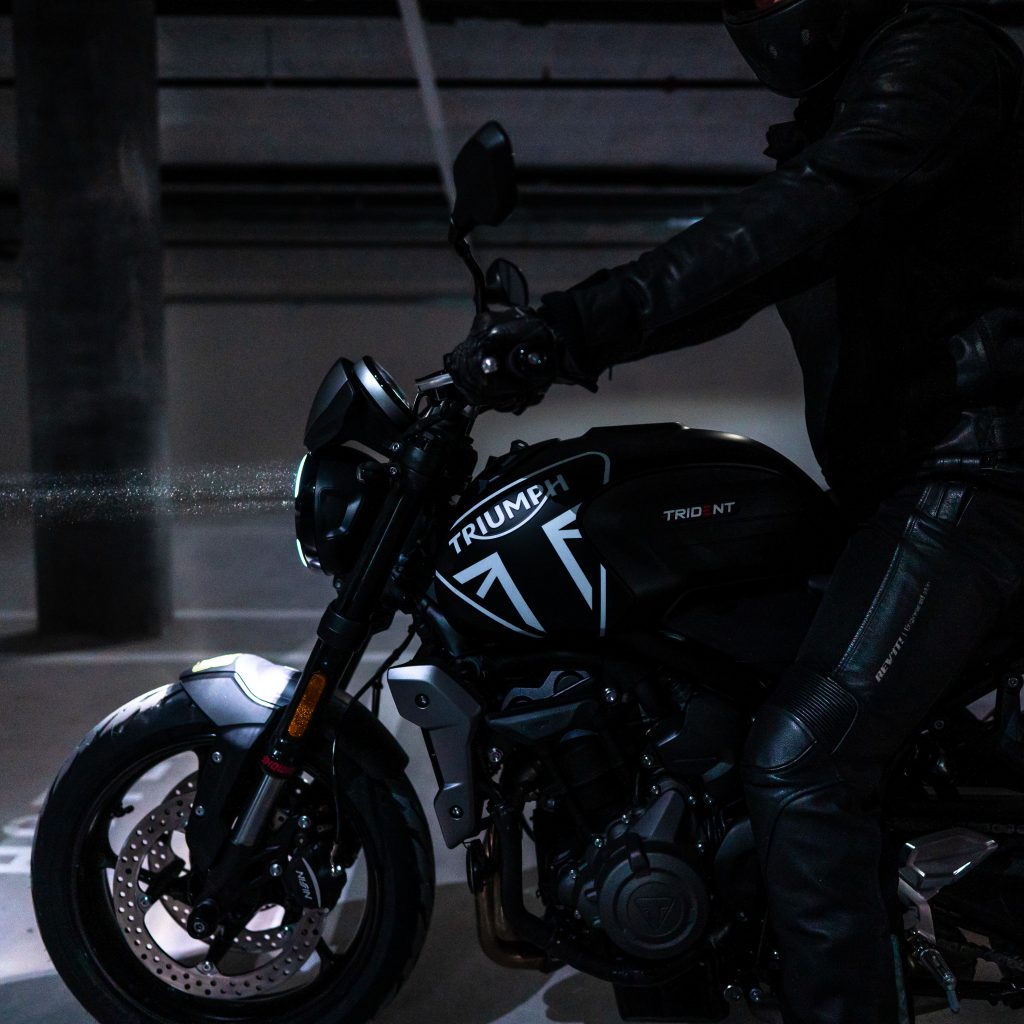
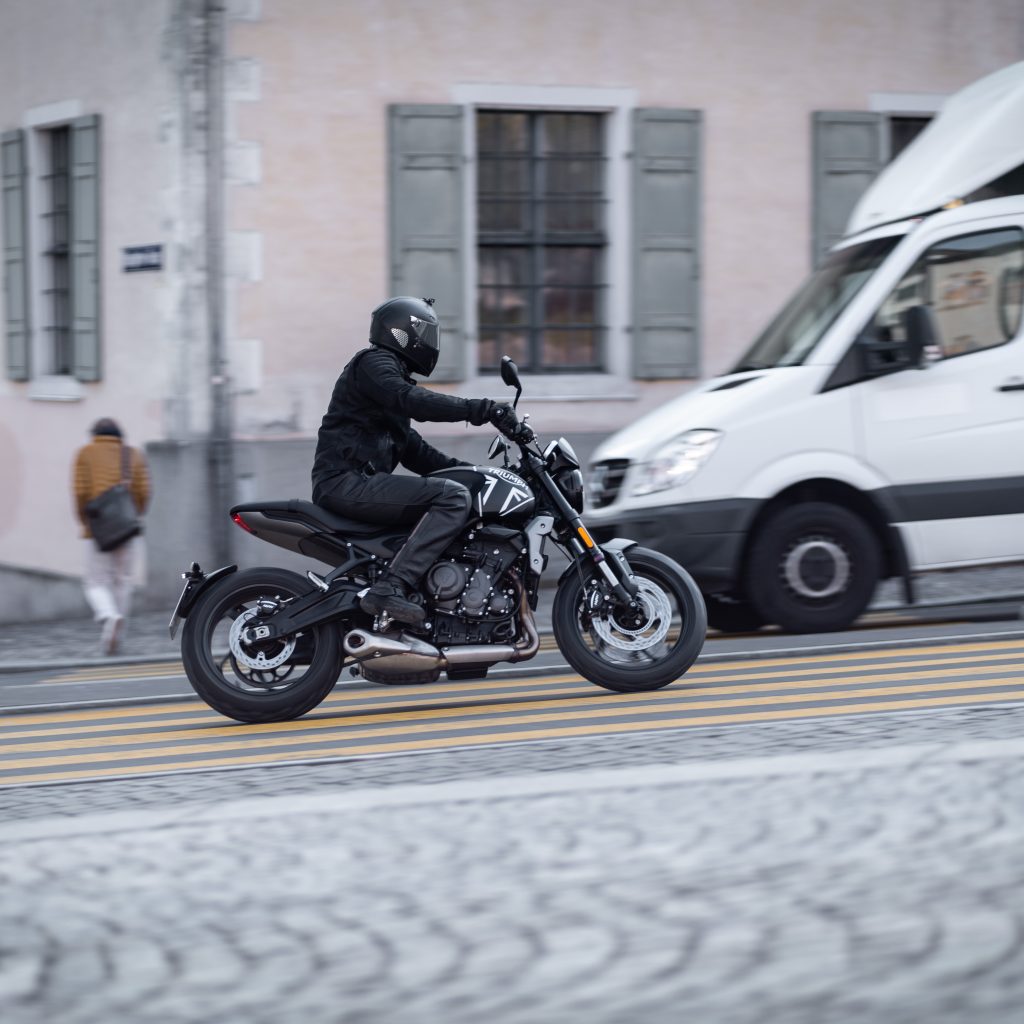
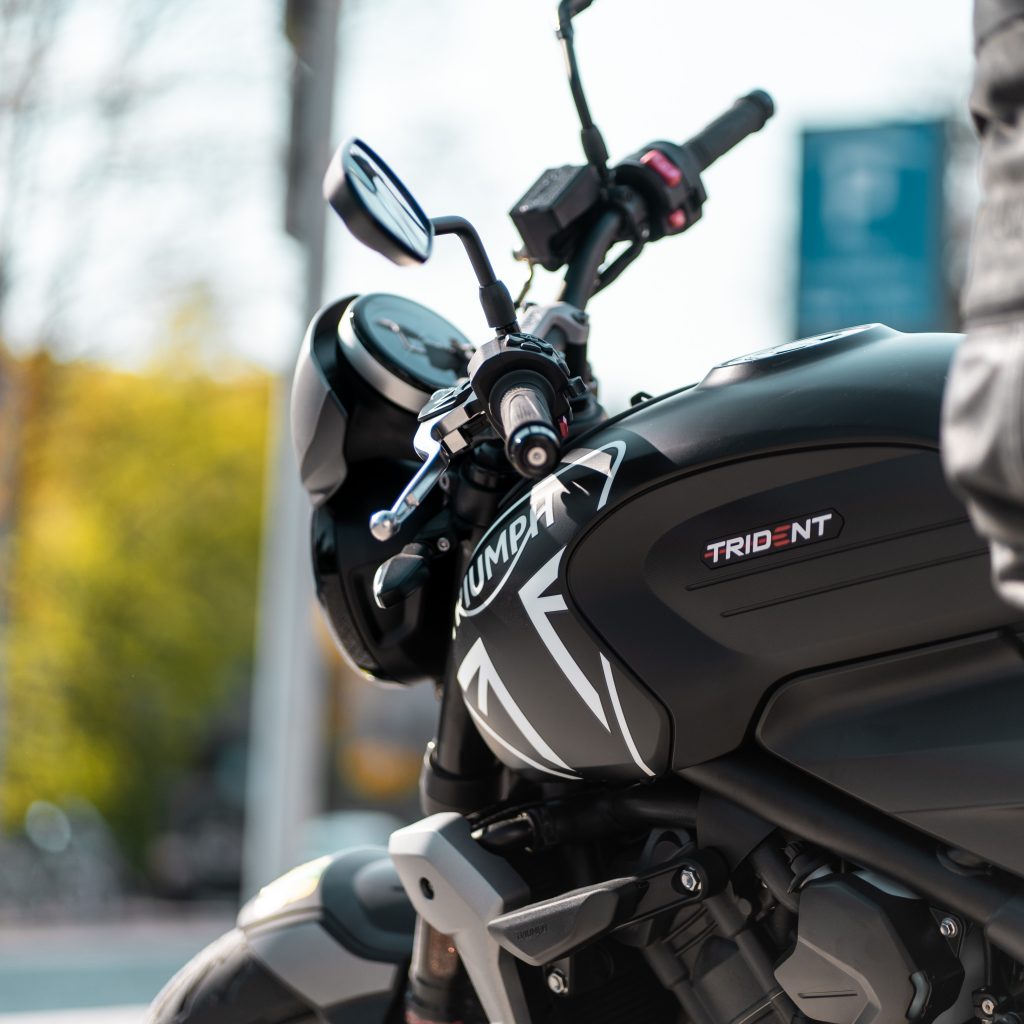
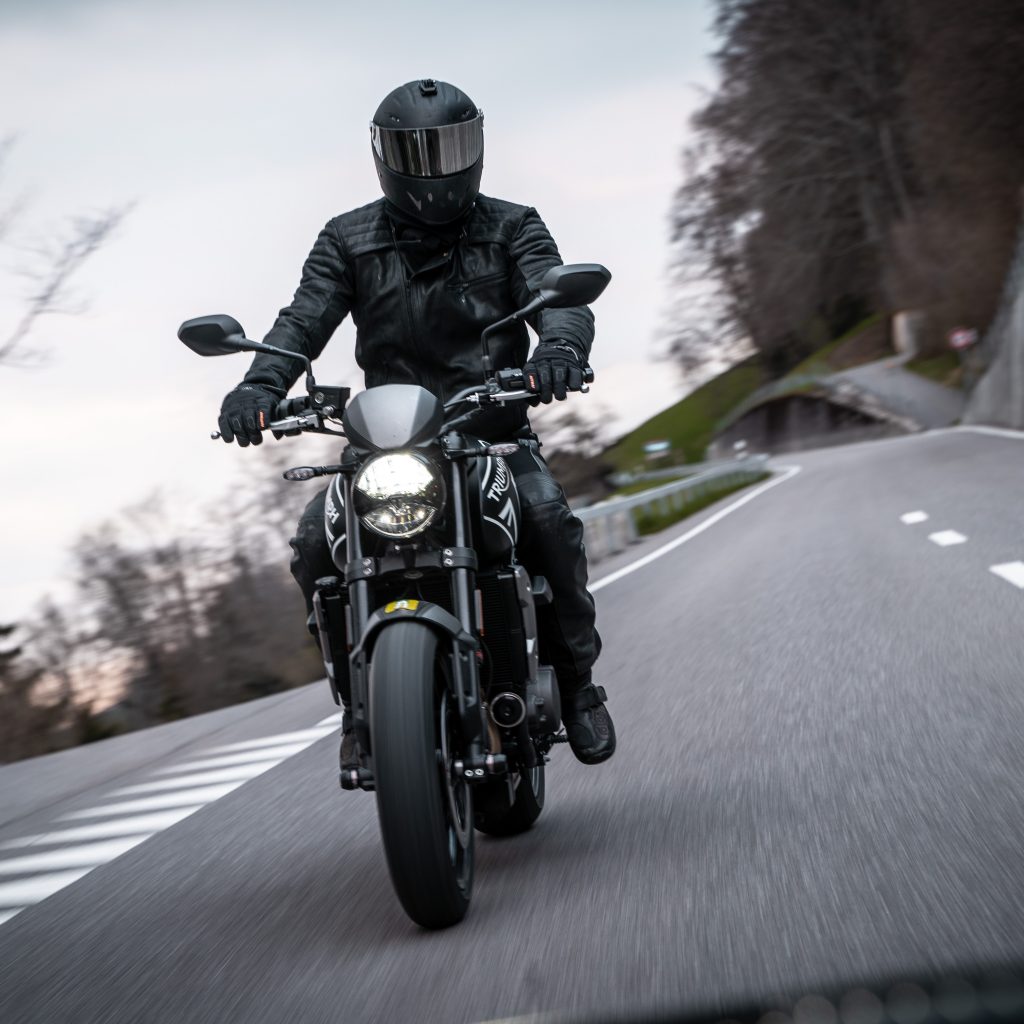
Hey guys and welcome back to a new blogpost. This is something special for me I have never done before in my life so lets see how it goes. I am driving motorbike since im 16 years old and definitely love to be on the road with a bike. Special thanks to Triumph Germany for partnering up as an Ambassador for this special traditional company.
In this blogpost I am going to give you a review of the new Triumph Trident 660. It’s the new middle class bike for beginners and for every day use for advanced motorbike riders.
“Triple powered performance, class leading technology and specification, all at an incredibly competitive price.“
Appearance:
4 different Colours (Matt Jet Black Silver Ice / Silver Ice Diablo Red / Saphire Black / Crystal White)
Matt black with a few details red and silver
Cool number plate holder
Stubby short tail section
LED Lights
The 660 triple engine delivers the perfect balance of low down torque and exhilarating top end power for optimum thrilling and responsive performance.
Facts:
660ccm
64nm peak torque
81 PS Peak Power
16.000km service intervall
6 gears
Seat Hight 80.5 cm (tall or shorter riders? Yes its neither as low as a bobber and tall as a tiger) – but you cant lower it!
Tank Capicity 14L
189 kg
Is it a good everyday Bike? – Distance Bike?
It is not really good touring bike because it has no windscreen, bags etc., BUT definitely a every day bike for some tours and also for the city. It is very good to handle and that makes it the perfect bike for people and for young beginner driver. Also perfect as second bike for every day instead of using your expensive one. The third group the Trident is perfect for are older riders that want to downgrade.
You have a nice upright riding position, its very light and easy movable and has power as well. The throttle is very easy for beginners (not as aggressive). The bike comes with two modes: Street mode and Rain mode (Less aggressive throttle responds)
Display:
Shows everything you need
Speed
Time
Gear position
Rotation speed
Lights
ec.
Additional Navigation pairing with phone
Accessories:
Quick Shifter
Heated Grips
Bluetooth Modul – Navigation
USB Charger under Saddle
No exhaust accessory
Personal Final feedback
The Trident 660 by Triumph is the perfect mix between a beginner bike and also perfect handling for an every day bike. It combines traditional with modern style and you will be unique, instead of all the Yamaha MT 07, Honda CBR and Kawasaki out there.
Its the perfect allrounder and I can really recommend to go and check it out!
Thats about what I have to say about the motorbike. You will find the full review on my Youtube Channel so definitely go and check out how the bike looks on the road.
Welcome guys back to another blogpost. I had the honour to be part of the grand opening of Joyn Zürich. I will be living here for the foreseeable future, so I thought I will give you a room tour – a tour of the whole building actually – which has so much to offer. Let’s go!
The Check In
When you get in the first thing you see is a self check in. That’s a big advantage to other buildings, because you don’t have to wait. You can just check in with your Joyn card, which you will get at the start of your stay. You can use it for checking in and for the elevator.
Also you will see the working area and a Workspace area, which I will tell you about a little bit later on. If you have any questions, there also are host counters, where you can get your answers.
Key Data
Maybe I can answer a few of your questions already. The Building Joyn Zurich has almost 500 rooms to stay in. 104 hotel rooms and the rest are normal apartments. The big difference here is the kitchen area which only the apartments have.
The building is completely new and only 20 minutes away from the airport and 20 minutes away by train from the city centre. You only have to use one train, no stops in between, it’s really comfortable to get into the city. Also there is a garage to park your car in, but we will come to that later.
Now let’s talk about the different types of rooms they are. There are Studio+ rooms, studio rooms and the smaller rooms.
Studio+
We’ll start with the Studio Plus room, which is the biggest room available. It has roughly 40 to 50 square metre of living area.
The great thing about the Studio Plus room is the fully equipped kitchen. You have for example an automatic dishwasher and a microwave. Besides that the kitchen is fully equipped, you don’t need anything to bring with you. The same goes for the rest of the apartment. It is fully furnished and you even have a smart TV with Netflix and YouTube – anything you may need.
But of course not everything is fun. Joyn is also for business travellers, so you have a – again – fully equipped working area inside your private room. There are chargers right where you need them and some space for books or laptops or anything you might bring with you work wise.
Let’s say you are done with a long day of cooking, watching Netflix and working. You need to sleep. It goes without saying, but every apartment has a beautiful sleeping area, which you can actually transform into a bedroom. How do you do that? By pulling two curtains and splitting the room into two different parts: a living/working area and a bedroom.
But wait, there’s something missing, isn’t it? Right, a bathroom! Everybody needs it. The spacious bathroom in this apartment is roughly 5 to 10 square metres big, with a huge mirror and a rain shower. One of my favorite features here is actually the laundry bag, which comes free. Everybody has to do laundry and everybody hates to go outside to laundry shops to wash. So this feature Joyn provides is what I want to tell you about next.
Laundry room
Joyn Zurich offers a laundry room. There are several washing machines and dryers in it, so everybody can wash their laundry when they need to. And the best thing is: you don’t need any cash. Also you don’t have to look at the time, because when your laundry is ready, you will get a notification on your phone.
Having said that let’s go to the studio apartment, which is one size smaller than the Studio Plus apartment. It has also some nice features.
Studio
The biggest difference between the studio and the Studio Plus apartment is the size, obviously. Except for that it’s basically the same apartment with a fully furnished living area and a fully equipped kitchen area, a dishwasher, a Smart TV and so on.
Cleaning Service
One big feature I didn’t tell you about until now is something for our lazy people out there. I know you exist and I know I am sometimes one of you. 😀 Joyn offers a weekly cleaning service. They clean your room, they change your bed sheets, give you new blankets and towels – everything you might need.
Every room in Joyn Zurich is equipped with one marshall speaker, which is really cool. Also there is one room in the building, where you can choose from different decorations and bring them up into your own private room. That way you can really get your own touch and feel at home.
Smart+
Smart+ is a bit smaller than the studio apartments, but just right for a simple stay. Also just as equipped as the other rooms. A big advantage of those rooms is that you have a little Terrace where you can enjoy the air and look at the nice courtyard.
Smart
For those that do not need a terrace and much space the apartment type „smart“ is right fit for. It’s the smallest apartment but offers the same features (SmartTV, fully equipped, cleaning service, private working desk, etc.).
Co Working Area
Right at the start I teased the Co working area at the ground floor. If you don’t want to work by yourself in your room, you can come down here and work in a big space with many other people, if they choose to do the same. There are different kind of chairs and couches, each with chargers and tables for you to work on. Everybody will find the best option for himself or herself in this area. Also there are small meeting spaces, if you have a meeting and don’t want to go into a cafe or fill out a big conference room with only a few people.
From there you can go right to the outside area, where you have several options to sit and enjoy the sun or chill with friends right in the middle of the building.
Basic
The last room I want to tell you about is the “basic” room. This is basically a hotel room, a significant feature of Joyn Zurich. In this room you have no kitchen area, like in most of hotel rooms, but you have a beautiful view over the city. The real eye-catcher though is the view on the roof.
Fitness Area
The most important feature of Joyn Zürich for me is the fitness area. It doesn’t matter if you only want to do some cardio or if you want to do some heavy lifting: John Zürich has it all. From treadmills to dumbbells, you will find everything you need.
We are almost through! The last thing is the garage below the building. It also has, like every part of Joyn Zurich, cool features: for example, the chargers for electric cars.
I will live here for the next 1 1/2 months. I am pretty sure I will enjoy my stay. And maybe I will see one of you guys here soon!
Here you will find the link for the official website of Joyn Zurich serviced living.